You bought a rod and reel as a starter combo, opened the box, and now there’s a rod in two pieces, a reel with a bunch of knobs you don’t recognize, a spool of fishing line, and zero clue what attaches to what first. The instructions inside the box assume you already know what a bail is.
This guide walks through the actual assembly: how the rod sections connect, how the reel mounts, how the line goes onto the spool and through the guides, how to tie it off, and the order to do everything so you’re not unspooling and respooling at the lake. The whole process takes longer the first time and gets faster with practice.
The instructions below assume a basic spinning reel setup, which is the most common type sold in beginner combos (see the best fishing rod-reel combos for beginners and the best spinning reels for beginners). Baitcasting reels and fly reels have different assembly steps; for baitcasting specifically, see the best baitcasting reels for beginners.
Key Takeaways
- Assemble the rod first, then mount the reel, then spool the line, then thread the line through the guides.
- Line goes onto the spool with the spool laid flat to prevent line twist, not standing on end.
- Open the reel’s bail before threading line through the rod guides; close the bail after the line is tied to the lure.
- Match line weight to the rod’s specifications, which are printed on the rod’s lower section.
What You Need
The minimum kit is the rod, the reel, a spool of fishing line, and scissors or nail clippers for cutting line. Most starter combos include the rod and reel together; line is often sold separately. Pick up a basic monofilament line in 6 to 10 pound test weight for general freshwater fishing.
You’ll also need a hook or lure to tie to the end of the line once everything is assembled. That part comes last and depends on what you’re fishing for. For organizing the gear that goes with the rod, see the best fishing tackle boxes for beginners. For line selection itself, see the best fishing lines for different techniques.
Step 1: Assemble the Rod
Most fishing rods come in two pieces (called a two-piece rod) for easier transport. Look at where the two sections meet: one section has a male end (called the male ferrule, the part that fits into the other) and one has a female end (the receiving socket).
Align the two sections so the rod guides on both pieces line up in a straight line. Push the male ferrule into the female ferrule with a slight twisting motion. The sections should slide together smoothly and seat firmly. Don’t force a poor alignment; pull apart, realign the guides, and try again.
Quality rods include a tight fit that resists separation during normal use. If the connection feels loose, the ferrule may need a thin coat of paraffin wax (rubbed onto the male end) to improve the fit.
Step 2: Mount the Reel on the Rod
Look at the lower section of the rod for the reel seat: a metal or plastic ring with threading that the reel’s foot slides into. The reel has a flat metal foot designed to slide into this seat.
Unscrew the reel seat to open it fully. Slide the reel foot into the slot. Tighten the reel seat by screwing the ring against the reel foot until it’s snug. The reel should not wiggle or rotate independently of the rod once tightened.
The reel mounts with the handle on the bottom for casting purposes (most casts have the rod held with the reel underneath the rod). Right-handed anglers typically retrieve with the left hand, which means the reel handle should be on the left side. Most reels allow handle-swap from one side to the other; check the reel’s manual if needed.
Step 3: Open the Bail
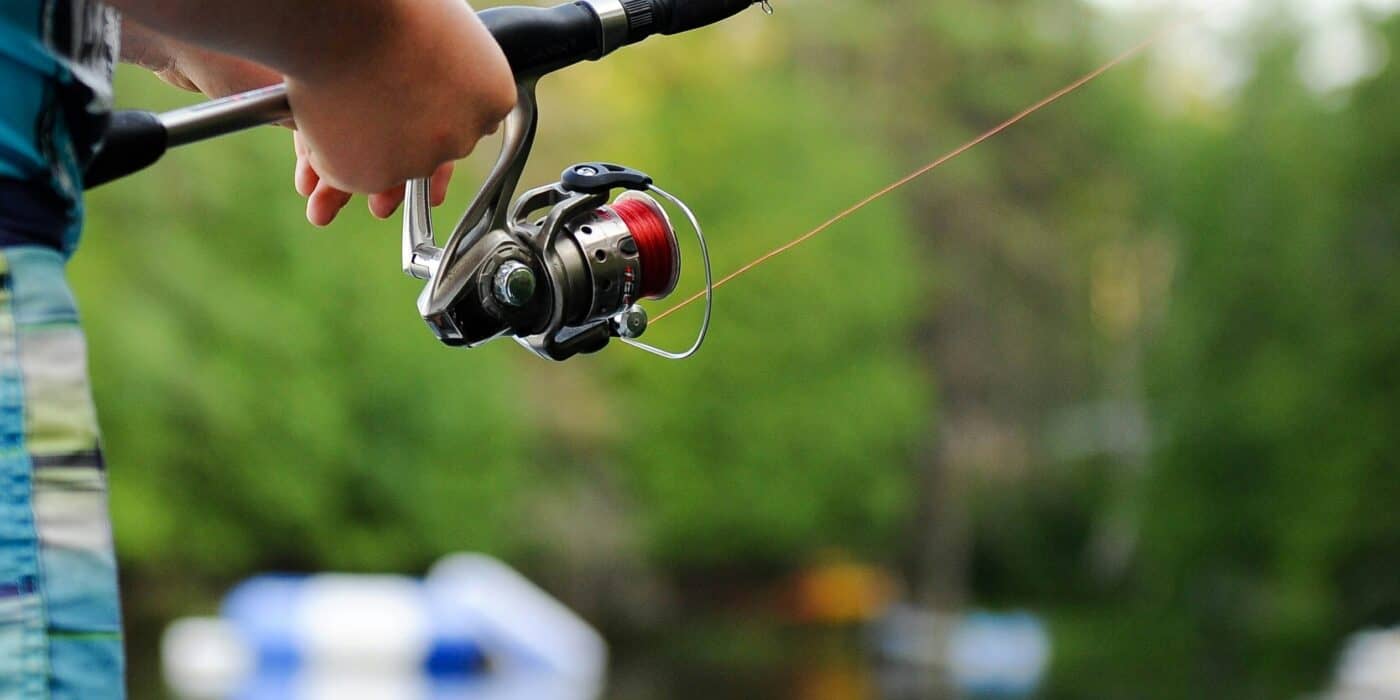
The bail is the wire arm on the reel that flips open and closed. With the bail closed (the standard position), line stays locked on the spool. Opening the bail (flipping it back) releases the line so it can flow off the spool freely.
Open the bail before threading line. Most spinning reels have a small lever or button that releases the bail; on simpler reels, flip the bail wire over manually with one motion.
Step 4: Spool the Line Onto the Reel
Spooling is where most beginners create problems that don’t show up until they’re at the water. Done wrong, the line twists during use and creates tangles called bird’s nests.
Position the line spool correctly
Lay the new line spool flat on the floor or ground with the label side facing up. The line should come off the spool in the same direction as it goes onto the reel. Spinning reels feed line in one rotational direction; matching the spool feed direction prevents twist.
Thread the line through the lowest rod guide
Take the end of the line from the new spool and thread it through the bottom rod guide (the one nearest the reel). This is just to control the line’s tension as it goes onto the reel; you’ll thread the rest of the guides later.
Tie the line to the reel spool
Open the bail. Wrap the line around the reel spool and tie an arbor knot: pass the tag end of the line around the spool, then tie a simple overhand knot around the main line, then tie another overhand knot in just the tag end to prevent it slipping through the first knot. Pull tight against the spool.
Close the bail and reel in line
Close the bail by flipping it back to the closed position or turning the reel handle once (most reels close the bail automatically when you crank). Begin turning the handle slowly to wind line onto the spool.
Apply gentle tension to the line as it spools on, either by holding the line between your thumb and forefinger or by passing it through a damp cloth held between your fingers. The tension keeps the line tight on the spool so it doesn’t loop loose or tangle later.
Spool to within 1/8 inch of the spool edge
Stop reeling when the line reaches about 1/8 inch below the lip of the spool. Overfilling causes line to flow off too easily and tangle; underfilling reduces casting distance.
Step 5: Thread the Line Through All Rod Guides
Cut the line from the new spool. Now you’ll feed the line through each guide along the rod’s length, working from the reel up to the tip.
Open the bail again to let line flow freely. Pull a few feet of line off the reel. Thread the line through the bottom guide first (the largest guide, closest to the reel), then through each successive guide moving up the rod. The tip guide (the smallest, at the very end of the rod) is the last one.
Pull a few extra feet of line through the tip guide so you have working length for tying on your hook or lure.
Step 6: Tie On a Hook or Lure
The improved clinch knot is the standard beginner knot for tying line to a hook eye or lure. Pass the line through the hook eye, wrap the tag end around the main line several times, pass the tag end back through the small loop near the eye, then back through the larger loop you just created. Moisten with saliva and pull tight.
For more detail on this and other essential knots, see our guide on how to tie a fishing knot.
Step 7: Close the Bail and Test
Close the bail. Pull gently on the line near the rod tip; it should resist movement (the closed bail is holding the line on the spool). Open the bail; the line should flow freely off the spool now. This is the basic mechanism you’ll use for every cast: open the bail to release line during the cast, close it after the cast to retrieve.
Test that the setup feels right by holding the rod in your dominant hand with the reel underneath. The reel handle should be on the opposite side from your dominant hand so you can retrieve with the non-dominant hand while keeping the rod steady.
Setup Mistakes That Show Up at the Lake
Line twist from spooling wrong: if the spool was standing upright instead of laid flat, the line was being twisted onto the reel. The twist manifests as line that wants to loop and tangle during casting. The only fix is to strip the line off and respool correctly.
Overfilled spool: too much line on the spool causes coils to spring off during casting. Strip off the top few feet and rewind, leaving the proper 1/8 inch gap.
Underfilled spool: too little line reduces casting distance and means the line drags against the spool edge. Add more line until the proper fill level is reached.
Loose reel mount: a reel that wiggles in the seat will throw off casts and feel unstable. Tighten the reel seat ring until the reel is firmly held.
Misaligned rod sections: if the rod guides don’t form a straight line from butt to tip, the rod won’t cast properly and stress concentrates on the misaligned section. Pull apart and reassemble with guides aligned.
Once You’re Set Up: What Comes Next
The assembled rod and reel is just the starting point. The actual fishing skills (casting, reading water, knot tying, fish identification) develop with practice. The guides on how to cast a fishing rod and how to fish from shore cover the next steps after setup.
Practice casting in an open area like a backyard before going to actual water. Tie a small practice plug or weight to the line instead of a hook and work on the motion until it feels natural. Open the bail, swing the rod back over your shoulder, swing forward, release the line at the right moment, close the bail when the lure lands. Once you’re catching fish, the next-step technique is timing the hookset; see how to set the hook when fishing.
Frequently Asked Questions
How much line do I need to put on a new reel? Most spinning reels hold 100 to 200 yards of typical line weight. Fill to within 1/8 inch of the spool edge for the right amount. The reel may have a capacity printed on the spool indicating recommended yardage.
What pound test line should a beginner use? Six to ten pound monofilament is the standard recommendation for general freshwater fishing. Lighter line (4 to 6 pound) for small fish like panfish; heavier line (10 to 14 pound) for bass and similar. The rod itself lists recommended line weight on the lower section.
Can I leave line on the reel between fishing trips? Yes. Monofilament line stays usable for a season or two on the reel before it loses strength and becomes brittle. Replace line annually if you fish frequently; less often if the rod sees occasional use.
What’s the difference between a spinning reel and a baitcasting reel? Spinning reels mount under the rod with a fixed spool and an opening bail; they’re easier for beginners and handle light to medium line well. Baitcasting reels mount on top of the rod with a rotating spool; they handle heavier line and lures but have a steeper learning curve due to backlash potential.
Do I need to break in a new rod and reel? Not really. Modern rods and reels are ready to use out of the box once assembled. The reel may feel slightly smoother after a few hours of use as internal components settle.
How tight should I tighten the reel onto the rod? Snug enough that the reel doesn’t wiggle or rotate. Don’t over-tighten to the point where the reel seat threads strip. Hand-tight is the standard guideline.
Why does my line keep coming off the spool when I’m not casting? Either the bail is open (close it) or the line was overspooled and the excess is springing off (strip some line off and rewind).
Can I use the same rod for multiple types of fishing? Yes, within reason. A medium-action rod handles most freshwater species from panfish to small bass. Specialized fishing (heavy bass, saltwater, ice, fly) benefits from rods designed for that purpose, but a single rod handles general use well.